Opencast
Videos can be recorded and uploaded via the "Opencast Videos" block in Moodle. Later, the videos can be integrated via the editor and thus made available to the students.
An online video editor is also available. Recordings from the lecture halls with touch interface can also be made available to students directly in a Moodle course once they have been assigned to a course (see Opencast video platform).
More information about Opencast: Opencast video platform
JKU branding
In the Moodle courses from summer semester 2024 onwards, newly uploaded or processed Opencast videos will receive JKU branding depending on the category (Interdisziplinär, MED, RE, SOWI and TNF) with opening credits, title frame and end credits.
Videos shorter than 10s are automatically deleted by the system.
Add block "Opencast Videos" to the course
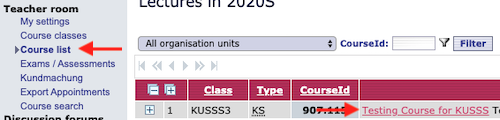
Select in KUSSS on the left under "Teacher Room" > "Course list" and click on the title of the course for which you would like to have an "Opencast Videos" block in the Moodle course.
In the "Additional functions" tab next to "Moodle and Opencast support", click on "Moodle and Opencast" and confirm with "Save". After two hours at the latest you will find the "Opencast Videos" block in the corresponding Moodle course.
If several courses have been combined in Moodle, then the "Opencast Videos" block will be created in the combined course as soon as the "Moodle and Opencast" support has been activated for one of the individual courses in KUSSS.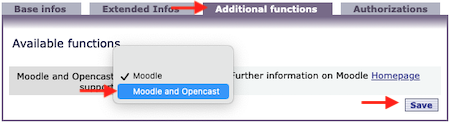
Add a video via Moodle in Opencast
- In your Moodle course, click on "Add video" in the "Opencast videos" block.

- Enter a Title.
Under "Show more..." you can enter further metadata. The metadata menu can be hidden again by clicking on "Show less...". This metadata (excluding Rights and License) is also available for students to view. The "Start Date" will be shown to you later in the "Start Date" column. It has no effect on the availability of a video and is for informational purposes only.
In the "Event Visibility" section, you can set in advance whether and, if so, from when students can generally access the video.
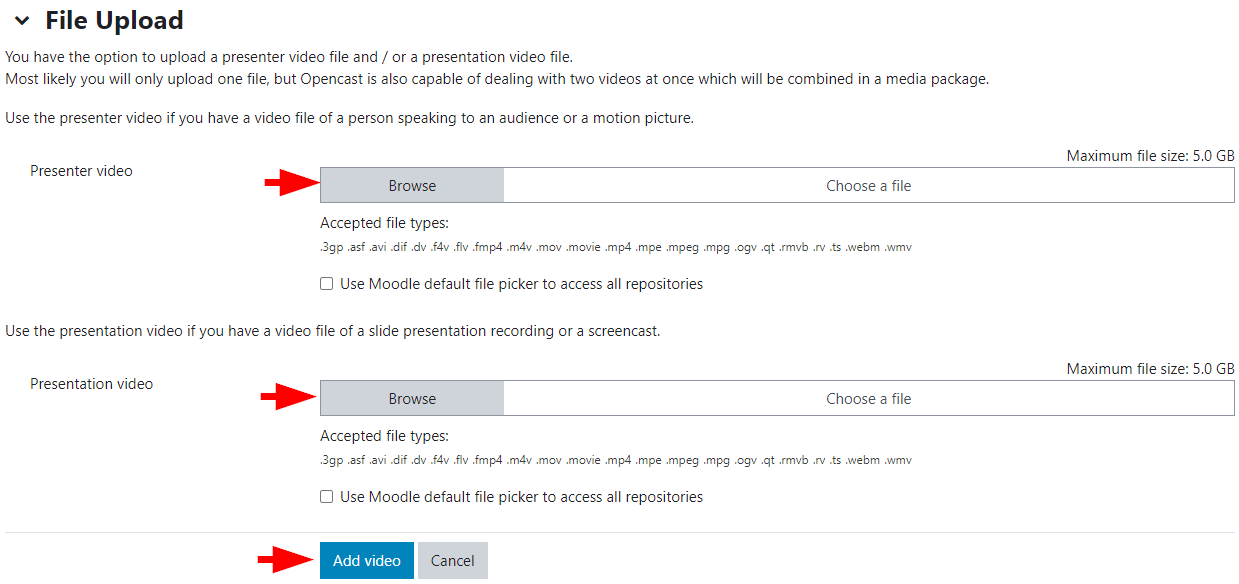
Select a Presentation video, optionally also one for the person giving the presentation ("Presenter video") and then click on "Add video". When you select two videos, they are displayed to students in one video window and played simultaneously. It is possible to switch between multiple display options.

- The new video is now in "Videos scheduled to be transferred to Opencast".

- As soon as the video has been transferred, it appears at the bottom under "Videos available in this course" with the status "Processing".
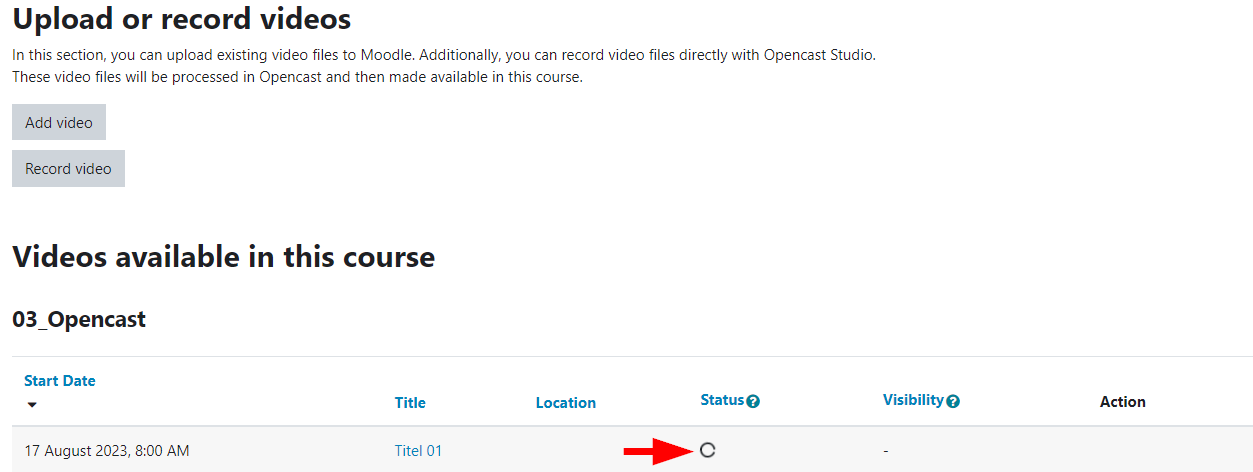
- After the video has been processed, the status changes to "Succeeded". It can now be made available to students.

Record a video via Moodle
When using the "Record video" function for the first time, an error message may appear. The next time the function is used, video recording will work.
- In your Moodle course, click on "Record video" in the "Opencast videos" block.

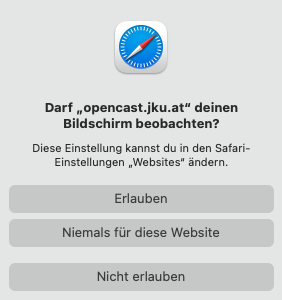
A new tab opens in your browser and you are on the Opencast page for recording a video. Click on desired option. Depending on the selection, Opencast requires access to a camera or a screen.

- To actually share the screen and camera, please select "Allow" after source selection.
- After that, please click on the gear icon at the bottom of the left window (screen sharing).
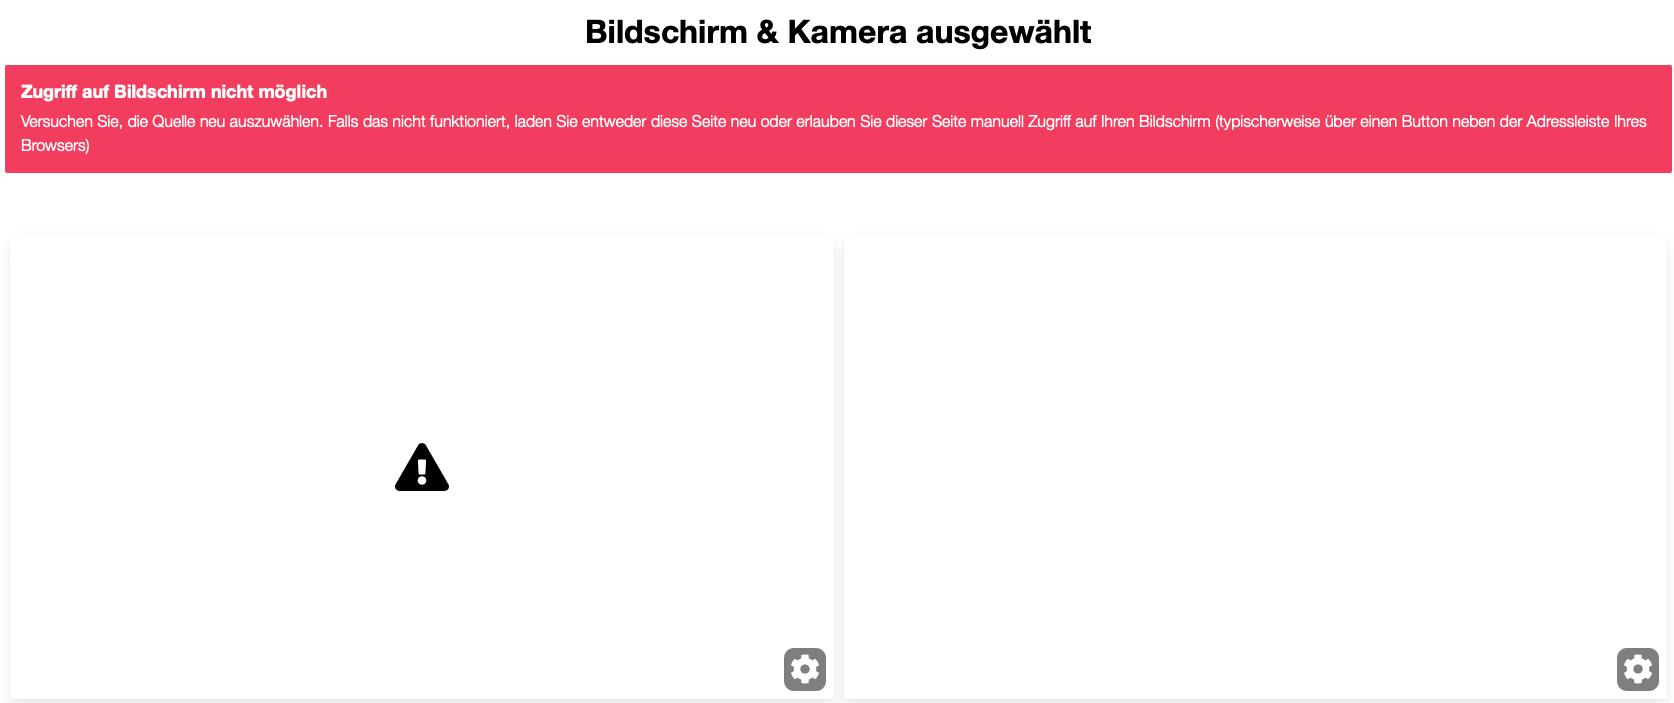
- Now select any resolution, e.g. "480p" and confirm again with "Allow". After that you can switch back to "auto".
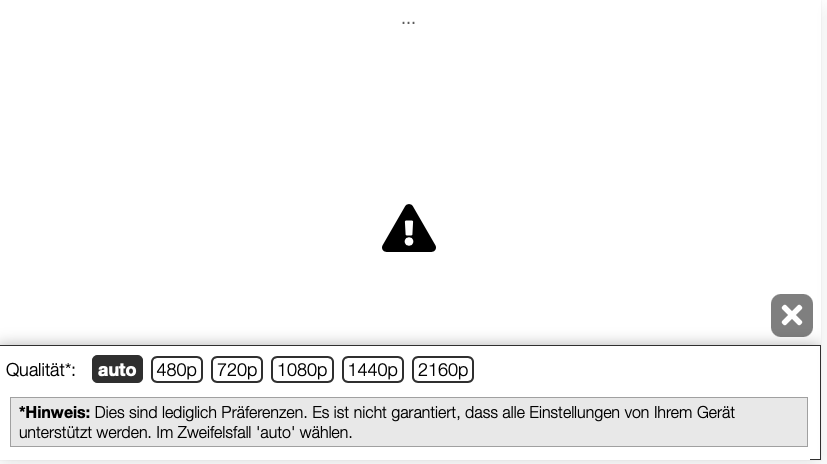
In Safari, window selection is not possible. The entire screen you are on at the beginning is always recorded. - If necessary, please repeat the process by clicking on the gear icon at the bottom right (camera share) and selecting any aspect ratio. Later you can switch back to "auto".
- To actually share the screen and camera, please select "Allow" after source selection.
- Select the sources by selecting e.g. for "Display" a whole screen or only a window (1) & (2) and click on "Share" (3).

- Make sure you have selected the correct sources and click on "Next".

- Select whether you want to record audio or not, once you have done this you will be taken to the recording window.

- Press the red button "Start recording" and perform your desired recording.

- You can also pause the recording in between (1). When your recording is finished, click on Stop (2).

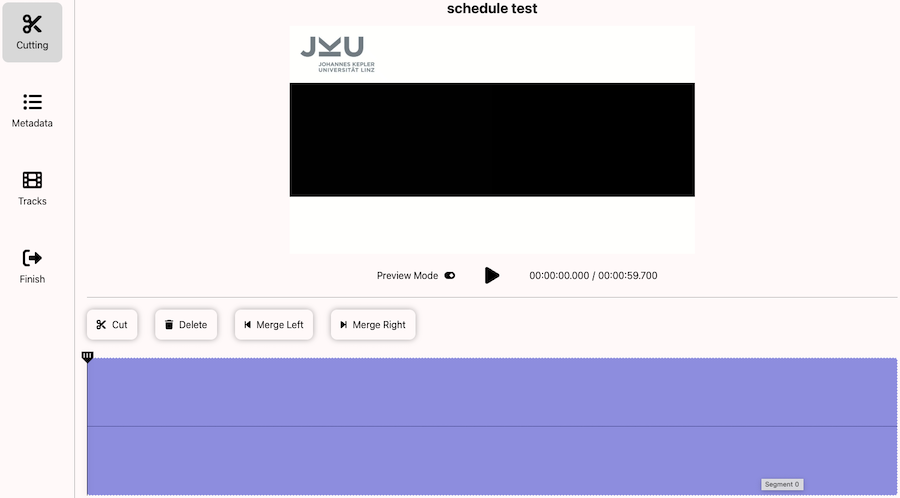
- You can shorten your recording at the front and back. To do this, click on the desired time on the green bar and use the two icons directly to the right and left of the play button to select whether this time indicates the start or end of the video.
If, for example, a beginning and an end were selected, it may look like this:
You can delete and reset the respective times with the recycle bin symbol. When you have finished, click on "Next". - Select a Title (1) for your video and click on "Upload to Opencast" (2). Alternatively, you can also "Download" the video (3).

Afterwards you can close the Opencast tab in your browser. - In your Moodle course, in the block "Opencast Videos", click on "Go to overview..." or "More videos...".

- After some time, the video will be in the list with the status "Succeeded".

- Before you embed the video in the Moodle course for the students, it is necessary to adjust the video visibility settings (see "Video visibility" below).
In Opencast, you always have access to videos that you have recorded yourself, regardless of your rights in Moodle.
Edit video online
Videos not recorded via Moodle in Opencast can be edited using a web editor.
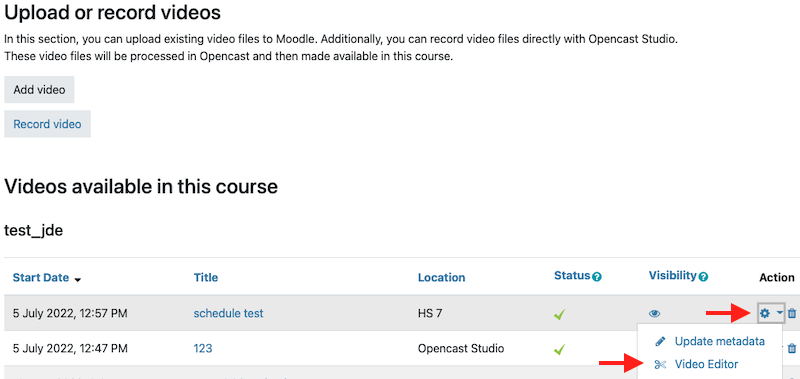
- To do this, click the gear icon to the right of the video and then choose "Video Editor".
- Edit your video and finally select "Finish" and then "Start processing" on the left.
Make video available to students
Videos uploaded via the "Opencast Videos" block can be made available in any activity or resource where there is an editor (page, assignment, etc.).
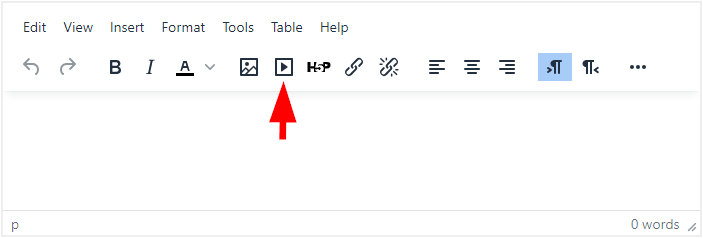
- Click on the button "Multimedia" in the editor.
- In the window that opened, select the tab "Video" and then "Browse repositories...".

- Select "Opencast" on the left and then the desired video.

- Confirm with "Select this file" and "Add media".


Video visibility
These settings are important to ensure that the videos are actually visible or hidden to students. Regardless of the settings of the activity in which the videos were included in the Moodle course.
- Open your Moodle course and in the "Opencast Videos" block, click on "Go to overview..." or "More videos...".

- There you will see an overview of all videos assigned to this course and the corresponding visibility setting.

The setting is represented by a corresponding icon in the "Visibility" column and can be changed by clicking on this icon.
- "Prevent any student from accessing the video"
 : Students cannot access the video in the Moodle course. If the video has already been included in an element in Moodle, an error message appears there.
 - "Allow all students of the course to access the video"
 : Students have access to the video in the Moodle course if it has been included in an element.
 - "Set a date and a visibility status for the event in the future, which will be performed using a scheduled task.": if you select this option, you can have the visibility changed automatically at a certain time.
The visibility settings of the videos in the Opencast block only apply to the people enrolled in this course. If the same videos are also in another course, then the visibility settings in the Opencast block must be made specifically for that course.
If you have adjusted the visibility or metadata, the status of the video will change to "Processing" for a short time. During this time, the video is still available to students.
Delete a video in Moodle
- In your Moodle course, click on "Go to overview..." or "More videos..." in the "Opencast videos" block.
- Click on the recycle bin next to the video you want to delete.
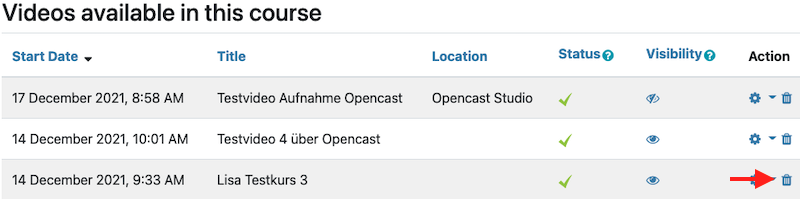
- Confirm the deletion by clicking on "Delete video permanently". The video will not end up in a recycle bin and will be permanently deleted.

- The video is still in the Moodle video list with the status "To be deleted" until it is deleted in Opencast.
If you have already made the video available to students via an element in the Moodle course, it must also be deleted there. Otherwise, an error message appears at this point. This also applies to H5P elements in which the video was used.
Import Opencast videos from an old course
By default, Opencast videos are not transferred when importing content. To import Opencast videos into your Moodle course, please open the new Moodle course and follow these steps:
- In your Moodle course, click on "Go to overview..." or "More videos..." in the "Opencast Videos" block.
- Choose "Import videos" at the bottom.

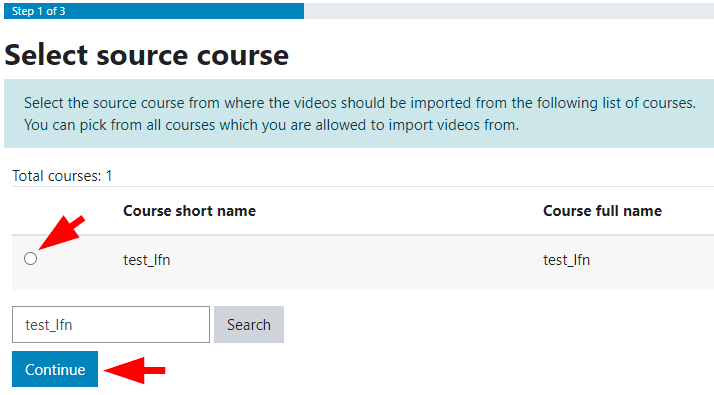
- In the next window search for the course from which you want to import videos, select the desired course and click "Next".
- Select all the videos you want to import and click "Next".

- Finally, click on "Import videos and return to the overview".

- This will import the video in the background and process it so that you can include it in the course later.

Important for a course import!
If you have imported course content from another course and Opencast videos were included in it, please swap the "old" video with the one imported via the "Opencast Videos" block in the activities and resources.
The visibility settings of the videos in the "Opencast Videos" block only apply to the people enrolled in this course. If the same videos are also in another course, then the visibility settings in the "Opencast Videos" block must be made specifically for that course.